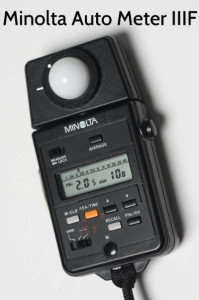
 The Minolta Auto Meter IIIF was the first light meter that I owned and used in the 80's. I would like to have had the IVF, but it was out of my price range. The reality is that this meter did what I needed it to do.
The best that I can tell, it was no longer made after the early 90's, but you can still buy this meter on Ebay for around $50. As of this writing, there is one with a starting bid of $9.99 from someone with a 100% positive feedback that states the meter "works great." I currently own two of these that I purchased off of Ebay. The most recent one was around $50. I also own the Minolta Auto Meter IVF which I doubt you will find for $50.
The Minolta Auto Meter IIIF runs off of 4LR44 batteries which you can get super cheap off of Amazon. This is the link to some that I just ordered from Amazon. I got (10) for $5.79. I hope this link will be valid for sometime. If not, you can simply search for the batteries online or find them locally. The Minolta Auto Meter IVF runs off (1) AA battery which is nice, but as previously mentioned, you will likely not get this meter for around $50.
What About Actually Using A Minolta Auto Meter IIIF?
The meter has an ambient light option and a strobe light option. You first need to set your ISO to what your camera is set at. This post assumes that you know about ISO settings on your camera i.e. 100, 200, 400, 800, etc. and that your strobes are already in position to take a meter reading. Once you have the ISO set and your strobes set up, you move the switch in the bottom left all the way over toward the lightning bolt (strobe setting). You then press and release the button on the right hand side while pointing the white ball back toward where your camera will be with the meter being held in front of your subjects face if doing a portrait for example. The reason that I mentioned where your camera will be is because you may have to have your camera in your hands to release the shutter in order to trigger the strobes to get your reading which will be an F-Stop. So if the meter reads F/8, you would simply set your camera to F/8. I am trying to keep it all very basic.
BONUS Tip: Balancing Strobes With Daylight
Although there is a technique to overpowering daylight for a nice effect, my focus in this section will be on balancing daylight and strobe for nice fill flash.
If you have looked at very many images, you have likely seen when a flash / strobes were used poorly outside. You may have even asked yourself..."why are they using flash outside?" Well, if it were very obvious a flash was used, the photographer likely didn't balance the flash / strobe with the daylight (ambient light).
In order to properly balance ambient and strobe, you first get your ambient light reading from your camera. Let's assume that you are at 1/200 (because that is around the highest flash sync with strobes) at ISO 100 (because you are outside) at F/8. This means that you want to get your strobe reading to no more than F/8 and even 1/2 to 1 stop less. One full stop would be F/5.6. Again this post assumes that if you are ready to use a light meter for strobes that you already understand ISO and F-Stops (aperture).
The core reasons for using strobe with daylight are to fill the shadows and make your subject pop. If you get comfortable using daylight and strobe together, your images will likely improve over not using strobe lighting unless you are already using reflectors for fill which is another way to accomplish the same thing in many cases. You still may end up using reflectors even with strobe.
Technical Note
I will not go into details in this post: However, if you cannot get your shutter speed in line outside with your F-Stop where you want it to be in order to use a flash / strobe because of sync speed issues and getting a low enough F-Stop that you want, you may need to use a ND (neutral density) Filter. This YouTube video may help. FYI, I have not watched it.
Please use the SHARE icons below to share this post on various platforms.
David Williams
Latest posts by David Williams (see all)
- Black and White Film Shot Of Our Golden Retriever: Trigger - February 2, 2022
- January 22, 2022 – North Carolina Snow Images Shot In Franklin County - January 22, 2022
- Taking A Leap Of Faith: Hiring Your First Employee As A Creative - January 21, 2022
- Canon R3 High ISO 12800 to 102400 Test: Before & After ON1 NoNoise AI - January 17, 2022
- Canon Pro-2100 – 24 Inch Printer Is In The House At RTP Photo And Video - January 16, 2022
